Sunday, May 25, 2008

When Bunny Gets Ambitious

So we here have a four-day weekend that happens to include The Man's birthday. In anticipation of this big event, we went to the Fresh Fields and spent about $952 on groceries, and Bunny brought home a few things she ordinarily does not bother with, to wit:

Fresh Baby Artichokes. Canned artichokes are wonderful. They are a staple here Chez Nous. However, fresh artichokes are a rare pleasure and the Fresh Fields was offering a package of 12 for $3.99. So they came home.
Prepare baby artichokes pretty much the same way as grown-up artichokes, minus a little extra work. Step 1: Artichokes start to oxidize (go brown and ugly) quickly unless the process is counteracted by an acid, traditionally a bowl of ice water with the juice of a lemon. So first, get yourself a bowl of water and put the juice of a lemon in it.
Now let's get down to business. Are you ready? There he is. On your cutting board and you have your good big knife and a good little knife or vegetable peeler, and your bowl of weak acid solution. Here we go:
Step 2.
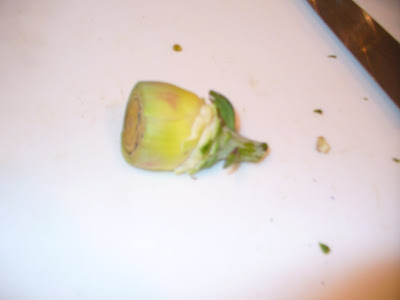
Whack off the grody end of the stem and about the top third. The "experts" all tell you to take of the stem. I like the stem, so I leave it on.
Step 3: Pick that baby up and look at the cut end. You'll see that the outer leaves are green and the inner leaves are more yellow. Stick your thumb in there are start ripping off the green leaves en masse, but leave the yellow ones behind:
Or you can do it the "expert" slowpoke deliberate way and peel off the green leaves one at a time until they're gone. The point, though, is that preparing artichokes doesn't have to be a big honking deal and my way is faster. You'll end up with something like this:
You'll have some tiny leaves near the stem, the kind of woody green outer layer of the stem itself, and the very bottom ends of the outer leaves where they attach to the heart. Your goal is to separate the woody, stringy, yucky part from the tender edible part.
Step 4:
Using either your paring knife or your vegetable peeler, just peel off the outer layer of the stem, starting from the cut end and working towards the leaves.
Go all the way around once, and you end up with this:
Plunk it in the lemon water. You are done.
Ta Da!
I don't have lemon water today. I have a half-empty pitcher of lime water, so I'm using that.
If you are preparing baby artichokes, you are done. If you are preparing grown-up artichokes (which I'm not, so I don't have pictures), you have to remove the "choke." In the very center of the leaves at the very heart of the thing is a layer of slightly prickly teeny tiny purplish leaves that surround a fuzzy crown of fibrous stuff that is as delicious to eat as dog hair or corn silk. Stick your thumb into the center of it all to separate the leaves, reach in there with a teaspoon, and scoop out the purple stuff and the hairy stuff and throw it away or compost it. This is easier to do if you cut the artichokes in halves or quarters the long way first, but that doesn't work if you need to leave the damn thing whole. Anyway, scoop out the choke and dunk the remaining good part into you lemon water.
Ta Da!
You are done.
Now you need to cook the damn things. Here is my way to do the babies.
Heat up a decent sized glom of olive oil and the juice of a lemon.
When the oil sizzles around the lemon juice, put in the babies.
Stir them around thoroughly for a good minute or two to ensure that they are nicely coated with the oil and the anti-brown making lemon juice because you don't want them getting brown and nasty. When the pan is nice and hot and everything is well coated, pour in about a quarter-cup or so of water. Heat until the water boils, stir a few times, then cover and turn the heat down to low or medium-low.

Let them steam for about 5 -8 minutes, checking them every so often for two reasons: 1. Is the water still making steam? If not, your pan is too cold. Turn the heat up. OR, you burned off all your water and you need to add more if the babies aren't done yet. 2. Are they done yet? Poke them through the center with a good knife to see how tender they are.

When they seem appropriately tender (use your own judgment. Pull one out and taste it if you don't trust yourself), take the lid off and turn the heat back up to boil off any remaining water. When the water is gone, the babies will saute a little in the dregs of the oil. I like to let them brown just a wee bit because they look prettier. When they look about right, pour them out into a bowl and dress with salt, pepper, olive oil (if you want) and acid of your choice (lemon or wine vinegar).

From here, you can marinate them for a salad, or slice them for a pasta sauce, or whatever. The whole shebang, from taking them out of the fridge until dumping them out of the pan, takes about 20 minutes. I'm not doing this on a work night, but when they're on sale and it's the weekend and I happen to feel like it, well, there you go.

Sunday, May 18, 2008

Breakfast

It may look disgusting, but it's not.


One ripe or even a little overripe banana. A handful of whatever other fruit happens to be around. A dribble of flaxseed oil. A scoop of protein powder. six ounces or so of unsweetened soy milk. Blend.

This one used blueberries, so it turned out sort of grey. However, delicious and good for me.

Sunday, April 27, 2008

I've spent a lot of time in the kitchen this weekend. I've cleaned and steamed a lot of vegetables and I made a french potato salad so I can toss together a Salade Nicoise later in the week. I made a big bowl of macaroni salad. I did my famous sweet and sour pork for dinner yesterday and I have a lot of left-over brown rice for making sushi. I've never done sushi before, so we'll see how it goes.
The best thing I made this weekend were these:

Blueberry Macadamia muffins. Muffins are no big deal. The recipe calls for a blend of white flour and whole wheat pastry flour, butter, and tons of sugar. I use plain old whole wheat flour, no white flour, no butter, and however much brown sugar happened to be left in the box. Plus blueberries, some chopped macadamias, and a handful of unsweetened coconut shreds.

Take the same recipe, substitute mashed banana for the oil and some of the buttermilk, substitute chopped pineapple for the blueberries, and reduce the sugar even more and you have Bunny's Special Armpit Muffins. So named because I made them for an event at work and I was feeling most unappreciated at the time. I was cranky, so I gave them a gross name. I kept it to myself, of course, but every time I saw someone with one, I thought:

Ha! You're eating an armpit muffin!

They sounded unwholesome and adulterated, but they weren't. They were clean and delicious. I was just being petty in secret, and I got over it. I kept the recipe and the name.

Wednesday, April 2, 2008

Sweet Tooth

Bunny wants a big slice of chocolate cake with extra frosting and a cold glass of milk. We don't have that here. We don't have anything good here. Bunny will have to settle for this:


mmmmmm. Homemade latte, extra strong espresso brewed in the stovetop mokka pot (fully caffeinated this afternoon) and just a little hot foamy skim milk, and some cinnamon.

Saturday, January 19, 2008

Yeast adventures

I don't bake a lot of bread or yeast doughs, because I don't eat a lot of bread qua bread. But I almost always have some homemade whole wheat in the freezer, and because I'm only using up my five-pound bag of rye flour in quarter-cup increments, and because I had a hankerin' for something chewy and full of caraway seeds, I pulled out the ole trusty pumpernickel recipe. I gave it three risings. The first for about 2 hours, the second for another 2 hours, and the third for about 90 minutes. By that time, it was getting close to bedtime, so despite the dough looking maybe 10% larger despite more than 5 hours of rising in a warm place, I baked it.

It is bread. And it is chewy and laced with caraway seeds. But it's also dense as, dense as, my similes have abandoned me. It's a hard dense loaf, tasty but heavy. I made grilled cheese sandwiches with it for lunch. Thin slices of pumpernickel and Gruyere cheese on the George Foreman grill. It wasn't bad, but I think this loaf is better suited to eating with soup. I must have killed the yeast at some point.

Saturday, January 5, 2008

Just so you know

This is how we do chocolate chip cookies around here.

Step 1: make dough.


Step 2: spoon out one cookie sheet's worth of dough. Bake.


Step 3: divide remaining dough into two portions. Put each portion into ziploc bag. Freeze.


Mmmmmmmm. Looks gloppy!

Just so you know, and not for any reason or anything, but these are the official chocolate chip cookie of people who don't really care whether or not the Redskins win today and thus will not be grossly disappointed if they lose because everyone knows the real show is Brett Fav-ruh next week.


Hey Bunny! When're you coming back to the sofa? Game's started!

Sunday, December 23, 2007

Things In The Freezer That Must Be Gotten Rid Of

I need some more freezer space. It is time to clear out some stuff.


I have some almond flour in the freezer, and some candied ginger in the pantry. That means it's time for more biscotti!


So delicious. But not everything in the freezer leads to something lovely:


Chili. It tastes good, but not so pretty in its partly-frozen state. But two containers of chili and half of the cornbread muffins are gone, as well as three bags of leftover pancakes, which frees up space for cookie dough and babka.
Babka is the basis for cinnamon rolls, another thing I wouldn't mind eating every day but that I only make for Christmas morning. Babka is a silky, buttery sweet bread dough. I use the recipe from Deborah Madison's Vegetarian Cooking for Everyone. I imagine I'll make the dough and assemble the cinnamon rolls today, freeze them overnight, then thaw them in the fridge overnight Christmas eve so they can be baked Christmas morning without over-rising. Then we won't eat them all, so we will need freezer space for the leftovers, unless the Old Folks in the South grub for them.